How to Measure Room Acoustics for Podcasting: Step‑by‑Step Tests, Tools & Fixes for Better Sound
Introduction
Podcast creators often assume that a good microphone alone will produce studio‑quality audio. In reality, the acoustic characteristics of the recording environment have a profound impact on clarity, intelligibility, and listener fatigue. This guide will teach the reader how to assess room acoustics, interpret measurements, and apply targeted treatments that reduce unwanted reflections and background noise. By following the systematic process, podcasters will achieve a more neutral soundstage, allowing their voice to shine without excessive post‑production effort.
The methods described are based on industry‑standard measurement techniques, yet they are presented in a way that an intermediate user can execute without specialized training. The guide also recommends reliable Amazon‑available tools that simplify each stage of the workflow. Even if the reader chooses not to purchase any of the suggested items, the underlying principles remain applicable.
Throughout the article, each recommended product will be linked at its first appearance, and a concise summary of its specifications will be provided in the final section.
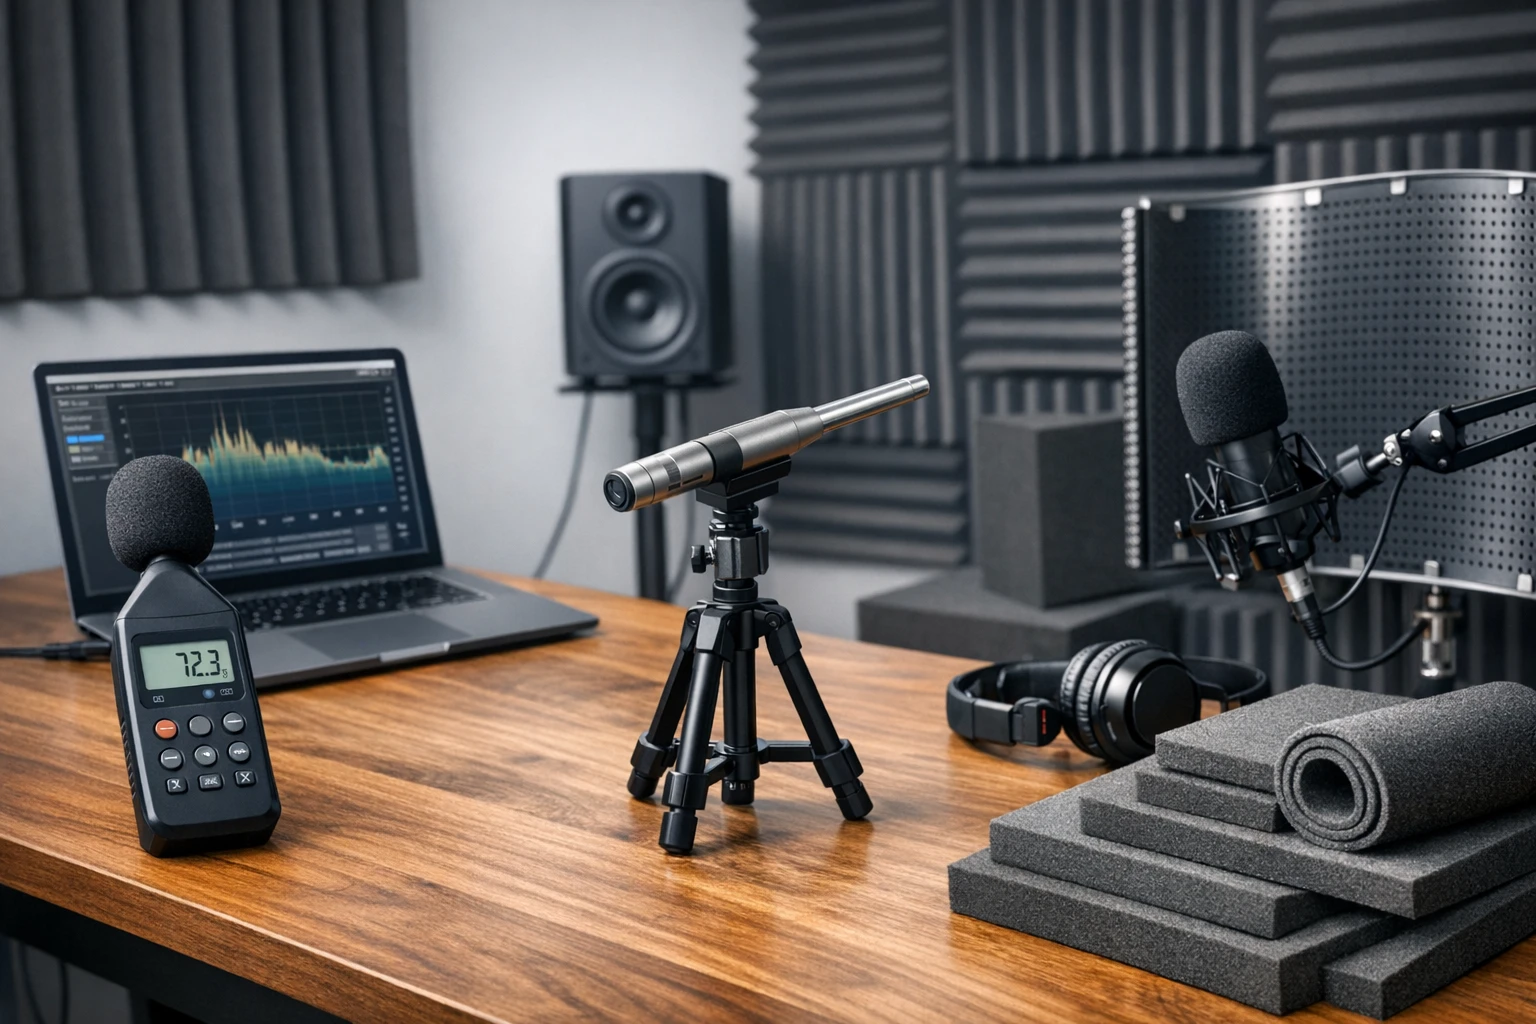
What You’ll Need
- Calibrated measurement microphone (e.g., ZXQDRE Measurement Mic or Audyssey Calibration Mic)
- Professional sound level meter (e.g., Protech Sound Level Meter)
- Laptop or desktop computer running Room EQ Wizard (REW) or similar analysis software
- Basic acoustic treatment materials (e.g., Trademark Soundproofing MLV and XIN&LOG Acoustic Foam Panels)
- Measuring tape, scissors, and adhesive (optional but helpful for installation)
Step‑by‑Step Instructions
Step 1: Establish a Baseline Recording
Before any measurement, record a one‑minute spoken segment using the intended podcast microphone and typical gain settings. Place the microphone at the exact position where it will be used during production, typically 6–12 inches from the mouth and angled slightly upward. This baseline will serve as a reference point for later comparisons, allowing you to hear the audible difference after acoustic treatment.
Listen critically for echo, boominess, or muffled high frequencies. Note any problematic frequencies that seem overly pronounced or suppressed. These observations will guide the focus of the quantitative measurements that follow.
Maintain a quiet environment during this test; external traffic or HVAC noise can mask subtle room resonances.
Document the recording file name, microphone model, and placement details in a simple log. This practice creates a reproducible audit trail.
Step 2: Measure Ambient Noise Levels
Ambient noise sets the noise floor for any podcast recording. Use a calibrated sound level meter to capture the background sound pressure level (SPL) across the room. The Protech Sound Level Meter offers a dynamic range of 30 dB to 130 dB, fast (125 ms) and slow (1 s) time weighting, and A & C weighting, making it suitable for both low‑level office chatter and higher‑frequency HVAC hum.
Set the meter to A‑weighting and slow response. Position the device at the microphone height and in the exact spot where the podcast microphone will be placed. Record the minimum, maximum, and average SPL over a 2‑minute interval. Typical quiet home‑office environments should register 30–40 dB(A) average; values above 45 dB(A) indicate intrusive background noise that may require mitigation.
If the meter displays a high maximum level, identify the source (e.g., refrigerator, street traffic) and consider simple actions such as turning off appliances, sealing windows, or scheduling recordings during quieter hours.
Write the SPL results into the same log used for the baseline recording. These numbers will help you evaluate the effectiveness of later sound‑proofing measures.
Step 3: Capture Frequency Response with a Calibration Mic
The most informative measurement for podcasters is the room’s frequency response, which reveals resonant peaks and nulls caused by standing waves. Connect a calibrated measurement microphone to a computer running Room EQ Wizard (REW). The ZXQDRE Measurement Mic provides a unique calibration file, a 20 Hz–20 kHz frequency response, and a robust die‑cast metal housing that ensures consistent results across sessions.
Steps for capturing the response:
- Install the microphone’s calibration file as instructed by the manufacturer.
- Place the mic on a small tripod at the intended speaker position, pointing directly upward.
- Generate a sweep tone in REW (20 Hz–20 kHz, 1 s sweep, 0 dBFS). Ensure the room is otherwise silent.
- Record the sweep and let REW compute the impulse response and frequency response curve.
The resulting graph will display peaks (often between 80 Hz and 250 Hz) and dips (typically above 2 kHz). Document the frequencies of the most prominent anomalies; these will be the primary targets for acoustic treatment.
If you prefer a dedicated AVR‑based solution, the Audyssey Calibration Mic integrates directly with many Denon, Marantz, and Onkyo receivers, allowing automated MultEQ calibration. However, the ZXQDRE mic offers greater flexibility for software‑based analysis and is compatible with REW, Dirac Live, and miniDSP.
Step 4: Analyse Results and Identify Problem Areas
Using REW, examine the waterfall plot and spectrogram to locate modal frequencies where energy accumulates. In a typical home studio, the room dimensions create axial modes at frequencies calculated by the formula f = (c/2)·n/L, where c is the speed of sound, n is an integer, and L is the room dimension. Compare these theoretical values with the measured peaks; a close match confirms a standing‑wave issue.
Next, evaluate the overall flatness of the response. A deviation of ±3 dB across the speech band (100 Hz–8 kHz) is acceptable for podcasting. Larger deviations indicate the need for absorption or diffusion.
Record the target frequencies for treatment in a table. For example:
| Frequency (Hz) | Issue | Recommended Treatment |
|---|---|---|
| 120 | Peak | Low‑frequency bass trap or MLV |
| 250 | Peak | MLV or dense foam |
| 3,000 | Dip | Mid‑high frequency acoustic foam |
Having a clear action plan simplifies the installation phase and prevents over‑treatment, which can deaden the room.
Step 5: Apply Acoustic Treatment
Based on the analysis, install the appropriate treatment materials. For low‑frequency issues, mass‑loaded vinyl (MLV) adds density to walls, reducing transmission and reinforcing bass absorption. The Trademark Soundproofing MLV is 1 lb per square foot, 1/8‑inch thick, and rated at STC 27, providing a cost‑effective barrier for walls and ceilings.
Installation tips for MLV:
- Measure the wall area where the low‑frequency peaks were identified.
- Cut the vinyl with a sharp utility knife; it tears cleanly due to its flexible nature.
- Attach the sheets using acoustic‑grade adhesive or staple them to studs, ensuring a tight seal to prevent air gaps.
- Seal seams with acoustical caulk for maximum effectiveness.
For mid‑high frequencies, acoustic foam panels absorb reflections that cause flutter echo and muddiness. The XIN&LOG Acoustic Foam Panels feature a wedge design that diffuses sound while providing an NRC of 0.4. They are lightweight, easy to mount with adhesive spray, and suitable for walls and ceilings.
Installation guidelines for foam panels:
- Identify first‑reflection points by sitting in the microphone position and having a friend slide a mirror along the wall; the point where the mirror reflects the speaker’s eyes is a reflection hotspot.
- Apply 3M 90‑spray adhesive to the back of each panel and press firmly onto the wall.
- Space panels evenly, covering at least 15‑20% of the total wall surface for noticeable improvement.
- Allow the adhesive to cure for 24 hours before recording.
After treatment, repeat the measurement process in Step 3 to verify that peaks have been attenuated and dips have been filled. Compare the new frequency response to the original baseline; a reduction of peak amplitude by 2‑4 dB typically indicates successful treatment.
Step 6: Verify Improvements and Fine‑Tune
Record a second one‑minute test segment using the same microphone placement and gain settings as in Step 1. Play both recordings side by side on a reference monitor or high‑quality headphones. Listen for reduced reverberation, clearer articulation, and a more balanced tonal quality.
Re‑measure ambient SPL with the Protech Sound Level Meter to confirm that background noise has not increased due to the new materials. If the SPL remains within the original range, the treatment has not introduced unintended noise sources.
Finally, document the final SPL values, frequency response graph, and any subjective observations. Maintaining this record enables future troubleshooting and informs any subsequent upgrades.
Tips & Pro Tips
- Use a tripod for the measurement mic. A stable platform prevents movement that could skew the impulse response.
- Calibrate your microphone before each session. Even calibrated microphones can drift; re‑loading the calibration file ensures accuracy.
- Measure at ear height. Position the mic at the same height as the podcaster’s mouth to capture the true listening environment.
- Combine absorption with diffusion. Over‑absorbing a small room can create a dead, unnatural sound. Consider adding bookshelf diffusers or decorative panels.
- Seal doors and windows. Simple weatherstripping can reduce external noise without major construction.
- Document everything. A spreadsheet with dates, measurements, and treatment actions becomes an invaluable reference.
Troubleshooting
Problem: Persistent low‑frequency boom despite MLV installation.
Solution: Add bass traps in room corners, as corners concentrate modal energy. DIY traps can be constructed from dense fiberglass wrapped in breathable fabric.
Problem: Measurement mic reports erratic SPL spikes.
Solution: Verify that the USB‑C connection is secure and that no background processes are generating noise on the computer. Use the microphone’s built‑in windscreen to reduce airflow turbulence.
Problem: Acoustic foam panels detach after a few weeks.
Solution: Re‑apply adhesive, ensuring the wall surface is clean and dry. For high‑traffic walls, consider using removable mounting strips instead of permanent spray.
Conclusion
Measuring and treating room acoustics is a systematic process that transforms a generic recording space into a professional‑grade podcast studio. By establishing a baseline, quantifying ambient noise, capturing the frequency response with a calibrated microphone, analysing modal issues, and applying targeted treatment such as mass‑loaded vinyl and acoustic foam, podcasters can achieve clearer speech, reduced echo, and a more consistent tonal balance. The tools recommended in this guide—calibrated microphones, a reliable sound level meter, and high‑quality acoustic treatment—streamline each step while delivering measurable results. Continued documentation and periodic re‑measurement ensure that the acoustic environment remains optimal as the room evolves.
Products Mentioned in This Guide
Frequently Asked Questions
What basic tools do I need to measure my podcast recording room’s acoustics?
A calibrated measurement microphone, an audio interface, and free analysis software such as Room EQ Wizard (REW) are sufficient; optional smartphone apps can also work for quick checks.
How do I conduct an RT60 (reverberation time) test in my home studio?
Play a swept‑sine or pink‑noise burst, record it with the mic at your listening spot, then use REW or similar software to calculate the decay time from the recorded sweep.
Which acoustic issues most commonly degrade podcast audio quality?
Early reflections from walls, standing‑wave resonances, and excessive background noise are the primary culprits that cause muddiness and listener fatigue.
What affordable treatments can I buy on Amazon to improve my room’s sound?
Acoustic foam panels, broadband bass traps, and portable reflection shields are inexpensive options that effectively reduce reflections and low‑frequency buildup.
Is a professional acoustic engineer required to achieve studio‑quality podcast sound?
No; by following a step‑by‑step measurement process and applying simple DIY treatments, most podcasters can attain a neutral, clear sound without expert assistance.