How to Mic a Two-Person Podcast: Best Microphone Placement, Distances, and Tips for Clear, Balanced Audio
Introduction
Creating a two‑person podcast demands careful attention to microphone placement, distance, and signal balance. This guide explains how to achieve professional‑grade audio using affordable yet capable equipment. Readers will learn how to select microphones, arrange a recording space, and fine‑tune gain settings for optimal clarity. The techniques described apply whether the hosts are in the same room or separated by a short distance.
What You'll Need
- Two dynamic or condenser microphones suitable for speech (examples are provided below)
- USB or XLR cables as required by the chosen microphones
- Desktop stands or boom arms for stable positioning
- Headphone monitoring solution with a 3.5 mm jack
- Basic acoustic treatment such as foam panels or blankets
Step 1: Choose Complementary Microphones
Selecting microphones that complement each other simplifies gain matching and reduces post‑production effort. The FIFINE K688 Dynamic Mic offers both XLR and USB connectivity, a cardioid pattern, and a high SPL of 130 dB, making it ideal for a primary host who requires flexibility between computer and mixer setups (price $51.09, rating 4.6/5). For the secondary host, the FIFINE AM8 USB/XLR RGB Mic provides similar dual‑mode operation, visual feedback through RGB lighting, and a built‑in mute button (price $44.99, rating 4.6/5). Both microphones share a cardioid pickup pattern that isolates each voice from background noise, ensuring that each participant is heard clearly.
If a fully USB‑only workflow is preferred, the FIFINE K669B USB Condenser Mic delivers plug‑and‑play convenience, a metal body for durability, and an on‑board volume knob for quick adjustments (price $29.99, rating 4.5/5). For hosts who wish to experiment with both USB and XLR connections while also receiving a comprehensive accessory bundle, the Samson Q2U USB/XLR Microphone Pack includes a desktop tripod, windscreen, and both cable types (price $98.99, rating 4.7/5). Each of these options provides a clear advantage over generic headset microphones because they capture a fuller frequency range and reduce ambient interference.
Step 2: Prepare the Recording Environment
A quiet environment is the foundation of clear podcast audio. Place the recording table away from windows, HVAC vents, and hard surfaces that reflect sound. Cover nearby walls with acoustic foam or thick blankets to dampen reverberation. Position a pop filter or foam windscreen directly in front of each microphone; although not listed among the recommended products, a simple foam cover can be purchased separately and dramatically reduces plosive bursts.
Maintain a consistent temperature and humidity level to prevent microphone diaphragm drift. Turn off computer fans or relocate noisy peripherals to a different room. By controlling these variables, the microphones can operate within their optimal signal‑to‑noise ratio, allowing the built‑in gain knobs to remain at moderate settings.
Step 3: Position the Microphones and Determine Distances
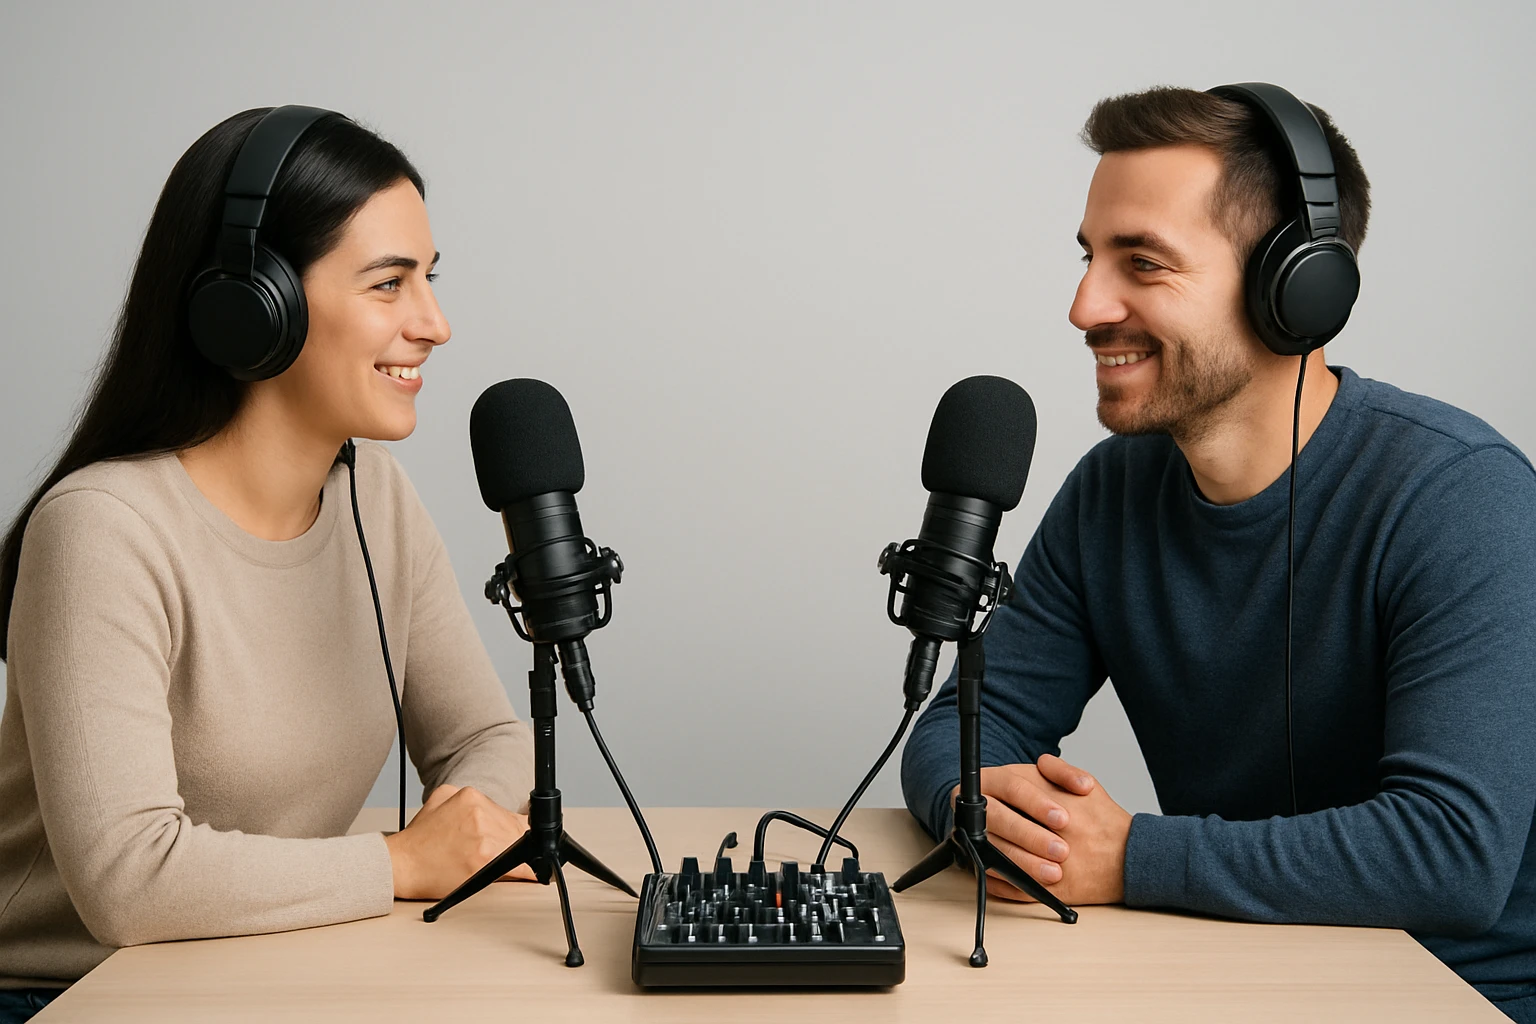
For two speakers seated side by side, place each microphone approximately 6‑8 inches (15‑20 cm) from the mouth of the respective host. Angle the microphones slightly inward (about 10‑15 degrees) so that each cardioid pattern points toward the speaker and away from the other microphone. This arrangement minimizes bleed while preserving natural vocal timbre.
If the hosts are separated by a short distance (e.g., across a small table), increase the spacing between microphones to 12‑14 inches (30‑35 cm) and use a slight tilt toward the center of the table. The FIFINE K688 and FIFINE AM8 both feature gain knobs that can be set independently, allowing each host to compensate for the slight distance variation without introducing distortion.
When using the Samson Q2U, take advantage of the included desktop tripod stand with an extension piece. Elevate the microphone so that the capsule aligns with the mouth level, reducing the need for the speaker to lean forward and inadvertently produce mouth clicks. Consistent height across both microphones contributes to a balanced stereo image in post‑production.
Step 4: Connect and Configure the Microphones
Decide whether the recording will be captured via USB directly into a digital audio workstation (DAW) or through an audio interface using XLR cables. For a simple USB setup, plug the FIFINE K688 into a computer using the supplied 8.2‑ft USB cable; the microphone is plug‑and‑play and requires no additional drivers. Activate the front‑panel tap‑to‑mute button to prevent accidental recordings, and adjust the gain knob until the input meter peaks around –12 dB.
When higher fidelity or multi‑track recording is desired, connect the microphones via XLR to an audio interface. Both the FIFINE K688 and FIFINE AM8 support XLR output, which reduces circuit noise and provides a cleaner signal path. Use balanced XLR cables (not included) and enable phantom power only if the microphone requires it; the listed dynamic microphones do not need phantom power, simplifying the setup.
The FIFINE K669B operates exclusively via USB, making it a convenient secondary mic for a guest who joins remotely. Its built‑in volume knob allows quick attenuation if the guest speaks loudly, and the 3.5 mm headphone jack on the FIFINE K688 and Samson Q2U enables real‑time monitoring without latency.
Step 5: Test Levels, Balance, and Monitoring
Before recording the first episode, perform a short test with both hosts speaking at typical volume. Observe the DAW’s input meters for each channel; the levels should be within 3 dB of each other to achieve a balanced mix. If one channel consistently peaks higher, reduce the gain on that microphone using the on‑mic knob rather than applying software compression later.
Use the headphone monitoring feature on the FIFINE K688 or Samson Q2U to listen for background noise, plosives, and clipping. Adjust the monitoring volume to a comfortable level; the ability to hear one’s own voice in real time helps the speakers maintain a consistent distance from the microphone.
For the FIFINE AM8, the RGB lighting can be set to a low‑intensity mode to avoid visual distraction while still providing a clear visual cue that the microphone is active. The mute indicator LED also serves as a quick visual reminder that the mic is muted, preventing accidental interruptions during the conversation.
Step 6: Record, Review, and Refine
Begin recording with a brief spoken intro to capture the natural room tone and verify that both microphones are functioning correctly. After the session, listen to the entire recording and note any sections where one voice dominates or where background noise is audible. Minor adjustments to microphone angle or gain can be made before the next episode, creating a continuous improvement loop.
If the recording includes music or sound effects, consider using the XLR output of the FIFINE K688 to route the signal through a mixer, allowing separate level control for voice and background tracks. This approach preserves the clarity of speech while providing flexibility for creative audio elements.
Finally, export the final mix at 44.1 kHz, 16‑bit PCM WAV format for maximum compatibility with podcast hosting platforms. The high SPL handling of the recommended microphones ensures that even enthusiastic speech remains distortion‑free during the conversion.
Tips & Pro Tips
- Maintain a consistent speaking distance of 6‑8 inches; this distance balances proximity effect and breath noise.
- Use the mute button on the FIFINE K688 or FIFINE AM8 during pauses to avoid capturing unwanted room sounds.
- Enable the headphone monitoring jack on the Samson Q2U to detect latency issues early in the session.
- When recording over long periods, periodically check the gain knobs for drift caused by temperature changes.
- Consider a small tabletop shock mount for the FIFINE K669B to further isolate vibrations from the desk.
Troubleshooting
Problem: One microphone is significantly louder than the other.
Solution: Reduce the gain knob on the louder microphone and verify that both are set to the same distance from the speaker.
Problem: Background fan noise is audible.
Solution: Relocate the fan or use a directional microphone like the FIFINE K688 which rejects off‑axis noise due to its cardioid pattern.
Problem: No sound is detected when using XLR.
Solution: Ensure the audio interface is powered, the XLR cable is fully seated, and that phantom power is disabled for dynamic microphones.
Conclusion
This guide has outlined a systematic approach to mic‑ing a two‑person podcast, from selecting complementary microphones to fine‑tuning gain and monitoring. By applying the placement distances, angle recommendations, and troubleshooting steps, podcasters can achieve clear, balanced audio without excessive post‑production effort. The recommended FIFINE and Samson models provide reliable performance at a reasonable price, enabling creators to focus on content rather than equipment limitations.
Products Mentioned in This Guide
Frequently Asked Questions
What is the ideal distance between each host and their microphone for a two‑person podcast?
Place each speaker about 6‑12 inches (15‑30 cm) from the mic, using a pop filter to maintain consistent volume and reduce plosives.
Should I use dynamic or condenser microphones for a two‑person podcast?
Both work, but dynamic mics handle background noise better, while condensers capture more detail; choose based on room acoustics and budget.
How can I prevent one host from sounding louder than the other?
Match the gain settings on each channel and use microphones with similar sensitivity, then fine‑tune levels in your recording software.
What basic acoustic treatments improve audio quality in a small podcast space?
Add foam panels or thick blankets behind and around the hosts to reduce reflections and echo without extensive soundproofing.
Why is headphone monitoring important during a two‑person recording?
It lets you catch issues like clipping, mic bleed, or volume imbalances in real time, ensuring a clean final mix.